Thursday, December 30, 2010

How Geometric Turbocharger Works?

How Geometric Turbocharger Works?

How Geometric Turbo charger Works?

Model: Hyundai Engine


2011  D 2.0 CRDI  Engine  Engine Control  P0234 Turbocharger/Supercharger Overboost Condition


Bottom of Form

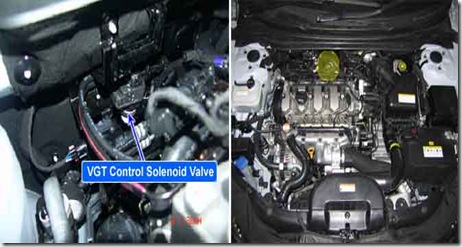
Study Guide and Component Location

clip_image004

Study Guide and General Description

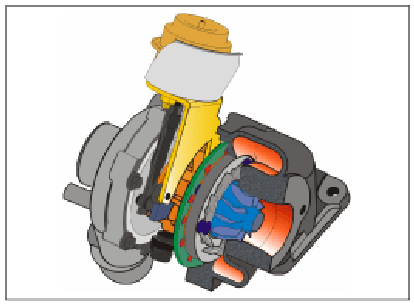
Study VGT(Variable Geometric Turbocharger) is the device which increases the efficiency of turbocharger at low rpm and lasts optimum turbo efficiency at high rpm as varying the cross sectional area through which exhaust gas passes turbocharger impeller. It relieves turbo lag at low speed and increse engine power generation. Study Engine speed, APS signal, MAFS and Boost pressure sensor data are inputted to ECM. Study ECM actuates vacuum diafragm which controls exhaust gas line as controlling VGT actuator duty to maintain optimum state of air compression.

clip_image005

Study Guide and DTC Description

Study P0234 is set when real boost pressure is much lower than target boost pressure for more than 15 sec. at above 1750RPM and 10~22mg/hub of fuel injection quantity. Study This code is due to poor connection of VGT solenoid valve vacuum hose, vacuum leakage, clogging, VGT turbo charger component failure.

Study Guide and DTC Detecting Condition

Item

Detecting Condition

Possible Cause

Study

DTC Strategy

Signal monitoring

VGT solenoid component

VGT vacuum line

VGT turbo charger component

Study

Enable Conditions

Engine running

(at above 1750RPM and 10~22mg/hub of fuel injection quantity)

Study

Threshold Value

Real boost press. is much lower than target boost press.

Study

Diagnostic Time

15 sec.

Study

Fail Safe

Fuel cut

NO

-

EGR Off

YES

Fuel Limit

YES

Check Lamp

ON

Specification

VGT Actuator Component Resistance

VGT Actuator Operating Hz

VGT Actuator Operating Duty

14.7 ~ 16.1Ω (20°C)

300Hz

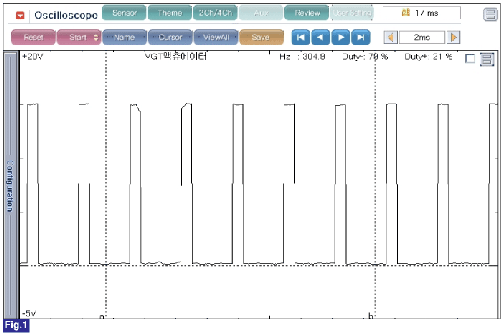
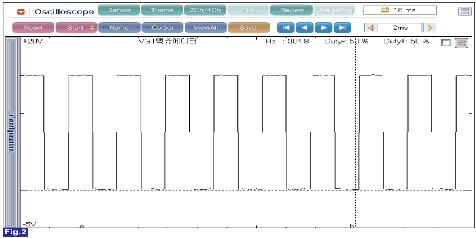
76% at idle, decreases as accelerating

Signal Waveform & Data

clip_image006

clip_image007

Fig.1) VGT actuator output waveform at 79% duty( (-)duty ). Duty decreases as boost pressure increases.

Fig.2) VGT actuator duty( (-)duty ) decreases as accelerating.

Saturday, December 25, 2010

How to Check the Secondary Fuel Pump of CRDI?

How to Check the Secondary Fuel Pump of CRDI?

How to Check the Secondary Fuel Pump of Fuel Pump?

Model: Hyundai Cars

Fuel: Diesel

Year of Model:2011

Displacement: 2000cc


2011  D 2.0 CRDI  Engine  Engine Control P0231 Fuel Pump Secondary Circuit Low


Bottom of Form

Study Guide and Component Location

clip_image004

Study Guide and General Description

Study Vain pump type fuel pump which is driven by electric motor is applied to this vehicle. Study Fuel pump which is installed inside of fuel tank supplies fuel to high pressure pump. Study ECM controls Fuel pump relay to supply power to low pressure fuel pump. Study The relay operates for 1.5 sec. for the diagnosis fuel pump relay at IG KEY ON, then if engine speed above 45rpm is detected by CKPS, relay turns ON and fuel is supplied to high pressure pump.

Study Guide and DTC Description

Study the P0231 is set when no current or excessively low current is detected in fuel pump relay control circuit for more than 1 sec. Study at Fuel pump relay ON condition. This code is due to open or short to ground in glow relay control circuit or internal open in Fuel pump relay component.

Study Guide and DTC Detecting Condition

Item

Detecting Condition

Possible Cause

Study

DTC Strategy

Voltage monitoring

Fuel pump relay control circuit

Fuel pump relay component

Study

Enable Conditions

IG KEY "ON" (monitoring only performed within relay operating condition)

Study

Threshold Value

Short to GND

Wiring open

Study

Diagnostic Time

1.0 sec.

Fail Safe

Fuel cut

NO

-

EGR Off

NO

Fuel Limit

NO

Check Lamp

OFF

Specification

Relay Coil Resistance

Motor Type

Pumping Pressure

75±10Ω(20°C)

Electric motor type vein pump

4 - 5 bar

Study Guide , Study Guide , Study Guide , Study Guide , Study Guide , Study Guide

Monday, December 20, 2010

How to Repair my Sonata Engine not Start.

How to Repair my Sonata Engine not Start.

How to Repair my Sonata Engine not Start.

Model: Hyundai Sonata YF

Year of Model: 2011

Fuel: Gasoline

Displacement: 2400cc

1) Study Guide and Condition:

  • Study Engine not Starting unless shake the shifting lever.
  • Study Intermittent Shock Shifting During Driving.

2) Study Guide and Cause:

  • Due to Transmission Range Switch Internal Loose Contact.

3) Diagnosis :

  1. Study Scan tool Check
    = Transmission Range Switch.
  2. Study Check Shifting lever 3x then the problem occurs.
  3. Study Replace with Goo TR switch the make testing.= OK

4) Study Guide and Repair Parts

  1. Replace TR switch

Sunday, December 19, 2010

How Code P0101 Sets a Trouble?

How Code P0101 Sets a Trouble?


2011  D 2.0 CRDI  Engine  Engine Control  P0101 Mass or Volume Air Flow Circuit Range/Performance


Bottom of Form

Component Location

clip_image004

Study guide and General Description

Study Mass Air Flow Sensor (MAFS) is digital sensor. Study Measuring mass of air flow, signal is outputted as frequency(Hz). ECM performs EGR system feed back control with the information of measured mass air flow. Study (The role of MAFS in diesel engine is different from gasoline engine. Fuel injection quantity is decided by MAFS signal in gasoline engine.) Study When the amount of EGR gas(contains no oxygen) flowing into combustion chamber increases, the air passing through MAFS(contains oxygen) decreases. Study Thus, with the output signal change of MAFS accompanied by EGR actuator actuation, ECM determines the amount of recirculated EGR gas quantity.

Study Guide

Notice

Study NOx is produced in the reaction of nitrogen and oxygen. Study If least intake air required for complete combustion flows into combustion chamber by controlling EGR gas(contains no oxygen) Study which is recirculated to combustion chamber, NOx decreases because there is no supplementary oxygen to react with nitrogen.

Study Guide and DTC Description

P0101 is set 1)Study when Air mass ratio(real/threshold) above 1.5 or below 0.85 is detected for more than 10 sec.. or 2) short to battery or ground in MAFS or IATS signal circuit is detected for more than 0.58 sec. or 3) short to low or high voltage line in IATS signal circuit is detected for more than 0.6 sec.

DTC Detecting Condition

Item

Detecting Condition

Possible Cause

Study

DTC Strategy

Voltage monitoring

MAFS circuit

MAFS component

Study

Enable Conditions

Engine running

Study

Threshold Value

Air mass ratio(real/threshold) above 1.5 or below 0.85 - 12 sec.

Short to low or high voltage line in IATS signal circuit - 0.6 sec.

Shrot to battery or ground in MAFS or IATS circuit - 0.58 sec.

Study

Diagnostic Time

Refer to threshold Value.

Study

Fail Safe

Fuel cut

NO

-

Study

EGR Off

YES

Study

Fuel Limit

YES

Study

Check Lamp

OFF

Saturday, December 18, 2010

How CRDI Engine & Code P0182 Works?

How CRDI Engine & Code P0182 Works?

2011  D 2.0 CRDI  Engine  Engine Control

How CRDI Engine & Code P0182 Works?


P0182 Fuel Temp Sensor A Circuit Low Input


Bottom of Form

Study Guide and Component Location

clip_image004

Study Guide and General Description

Study Fuel Temperature Sensor is NTC thermistor installed in fuel supplying line. It Study senses the temperature of fuel supplied to high pressure pump. Study Fuel temperature is limited (engine power is limited) to keep fuel temperature from reaching at 120°C. This Study limit is to protect fuel line such as high pressure pump and injectors from damages due to rapid deterioration by vapor-lock phenomenon which can occur at high temperature or destruction of oil membrane.

Study Guide and DTC Description

P0182 is set when the voltage below 0.053V - minimum voltage of FTS output - is detected for more than 2.0 sec.. This code is due to short to ground in FTS signal circuit.

Study Guide and DTC Detecting Condition

Item

Detecting Condition

Possible Cause

Study

DTC Strategy

Voltage monitoring

FTS circuit

FTS component

Study

Enable Conditions

IG KEY "ON"

Study

Threshold Value

When output signal is below the minimum value.(below 0.053V)


Study Diagnostic Time

2.0 sec.

Fail Safe

Fuel cut

NO

Fuel temp. fixed at 85°C

EGR Off

NO

Fuel Limit

NO

MIL

OFF

Specification

Tmeaueeprtr

-3°C 0

-2°C 0

-0-0

00

2°C0

Resistance

22.22~31.78kΩ

13.24~18.10kΩ

8.16~10.74kΩ

5.18~6.60kΩ

2.27~2.73kΩ

Temperature

40°C

50°C

60°C

70°C


Resistance

1.059~1.281kΩ

0.748~0.904kΩ

0.538~0.650kΩ

0.392~0.476kΩ


Diagnostic Circuit Diagram

Thursday, December 16, 2010

How to Know the Defective Airflow?

How to know the Defective Airflow?

How to Know the Defective Airflow?

Model: Hyundai I30

Year of Model: 2011

2011  D 2.0 CRDI  Engine  Engine Control

Fuel: Diesel

Displacement: 2000cc


  P0101 Mass or Volume Air Flow Circuit Range/Performance


Bottom of Form

Study Guide and Component Location

clip_image004

Study Guide and General Description

Study Mass Air Flow Sensor (MAFS) is digital sensor. Measuring mass of air flow, signal is outputted as frequency(Hz). Study ECM performs EGR system feed back control with the information of measured mass air flow. (The role of MAFS in diesel engine is different from gasoline engine. Study Fuel injection quantity is decided by MAFS signal in gasoline engine.) Study When the amount of EGR gas(contains no oxygen) flowing into combustion chamber increases, the air passing through MAFS(contains oxygen) decreases. Thus,with the output signal change of MAFS accompanied by EGR actuator actuation, ECM determines the amount of recirculated EGR gas quantity.


Study NOx is produced in the reaction of nitrogen and oxygen. Study If least intake air required for complete combustion flows into combustion chamber by controlling EGR gas(contains no oxygen) which is recirculated to combustion chamber, NOx decreases because there is no supplementary oxygen to react with nitrogen.

Study Guide and DTC Description

P0101 is set 1) when Air mass ratio(real/threshold) above 1.5 or below 0.85 is detected for more than 10 sec.. or 2) short to battery or ground in MAFS or IATS signal circuit is detected for more than 0.58 sec. or 3) short to low or high voltage line in IATS signal circuit is detected for more than 0.6 sec.

Study Guide and DTC Detecting Condition

Item

Detecting Condition

Possible Cause

Study

DTC Strategy

Voltage monitoring

MAFS circuit

MAFS component

Study

Enable Conditions

Engine running


Study Threshold Value

Air mass ratio(real/threshold) above 1.5 or below 0.85 - 12 sec.

Short to low or high voltage line in IATS signal circuit - 0.6 sec.

Shrot to battery or ground in MAFS or IATS circuit - 0.58 sec.

Study

Diagnostic Time

Refer to threshold Value.

Fail Safe

Fuel cut

NO

-

EGR Off

YES

Fuel Limit

YES

Check Lamp

OFF

Specification

Intake air quantity (Kg/h)

Output frequency ( KHz )

Deviation [ % ]

20°C

80°C

8

1.97

± 3

10

2.01

2.01

± 2

40

2.50

2.50

± 2

105

3.20

3.20

± 2

220

4.30

± 2

480

7.80

7.80

± 2

560

9.50

± 3

Study , Study , Study , Study , Study , Study , Study , Study , Study , Study , Study

Tuesday, December 14, 2010

How SJB Affects the Head Light of Sonata Code B2510.

How SBJ Affects the Head Light of Sonata Code B2510


How SBJ (Smart Junction Box) Affects the Head light of Sonata Code B2510.

2011  G 2.4 DOHC  BCM  Smart Junction Box  B2510 Right Headlamp High Circuit Short to Ground


General Description

Study Once BCM receives head lamp high switch working signal, it sends the signal to SJB by CAN communition. SJB turns on headlamp high.

Study Guide and DTC Description

Study This code is set when head lamp high right circuit is shotted to ground for more than 150ms during right head lamp high operating.

Study Guide and DTC Detecting Condition

Item

Detecting Condition

Possible Cause

Study

DTC Strategy

Load Mornitoring

Poor connection

Short to ground in head lamp high right circuit

Faulty right head lamp high

Faulty SJB

Study

Enable Conditions

IG KEY ON.

Study

Threshold Value

It is abnormal if output voltage is 0V.

Head Lamp High right Circuit Short To Ground

Study

Diagnostic Time

Immediately

Study

DTC Erasing Time

DTC is erased immediately after trouble fixed.

Sunday, December 12, 2010

How to Replace and Check CVVT.

How to Replace and Check CVVT.

How to Replace and Check CVVT.

Model: Hyundai Genesis BH

Year of Model: 2010

Fuel: Gasoline

Displacement: 4600cc

How to Replace and Check CVVT.

2011  G 4.6 DOHC Engine  Engine Control  P0085 Exhaust Valve Control Solenoid Circuit Low (Bank 2)


Study Guide and Component Location

clip_image004

Study Guide and General Description

Study The CVVT (Continuously Variable Valve Timing) system is installed to the chain sprocket of the intake camshaft. Study This system controls the intake camshaft to provide the optimal valve timing for every driving condition. Study The ECM controls the Oil Control Valve(OCV), based on the signals output from mass air flow, throttle position and engine coolant temperature. Study The CVVT controller regulates the intake camshaft angle using oil pressure through the OCV. As result, Study the relative position between the camshaft and the crankshaft becomes optimal, and the engine torque improves, fuel economy improves, exhaust emissions decrease under overall driving conditions.

Study guide and DTC Description

Study When ECM detects short to ground in OCV(Bank 2-EX) control circuit, ECM sets DTC P0085.

Study guide and DTC Detecting Condition

Item

Detecting Condition

Possible Cause

Study

DTC Strategy

Power stage diagnosis(Exhaust)

Poor Connection

Open or Short to ground in power circuit

Open in control circuit

OCV

Enable Conditions

-

Study

Threshold value


Short circuit to ground

Diagnosis Time

Study

Continuous

MIL On Condition

2 Driving Cycles

Study Specification

Item

Specification

Resistance (Ω)

6.7 ~ 7.7 at 20°C(68°F)

Study Signal Waveform & Data

clip_image005

clip_image006

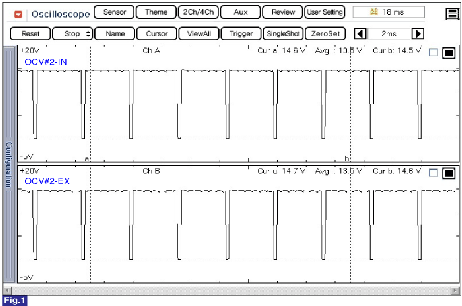
Fig.1) Normal waveform of OCV at idle.

Fig.2) Normal waveform of OCV at acceleration.

Saturday, December 11, 2010

How to Replace Output Sensor?

How to Replace Output  Sensor?


2010  G 1.6 DOHC  Transmission  Automatic Transaxle  P0722 A/T Output speed Sensor Circuit - Open or Short(GND)


Study Guide and Component Location

clip_image004

Study Guide and General Description

Study The Output Speed Sensor outputs pulse-signals according to the revolutions of the output shaft of the transmission. Study The Output Speed Sensor is installed in front of the Transfer Drive Gear to determine the Transfer Drive Gear rpms by counting the frequency of the pulses. Study This value, together with the throttle position data, is mainly used to decide the optimum gear position.

Study Guyide and DTC Description

Study The TCM sets this code if the calculated value of the pulse-signal is noticeably different from the value calculated, using the Vehicle Speed Sensor output, when the vehicle is running faster than 30 km/h. Study The TCM will initiate the fail safe function if this code is detected.

Study Guide and DTC Detecting Condition

Item

Detecting Condition

Possible Cause

DTC Strategy

Study

● Speed rationality check

● Signal circuit is open or short.
● Sensor power circuit is open
● Sensor ground circuit is open
● Faulty OUPUT SPEED SENSOR
● Faulty PCM

Study

Enable Conditions

● Battery Voltage ≥ 10V
● Lever position : D,3,2,L
● State of brake : OFF

Study

Threshold Value

● Output speed = 0

Study

Diagnostic Time

● More than 1sec

Study

Fail Safe

● Locked into 3rd or 2nd gear.
● Manual shifting is possibe(2 nd → 3 rd ,3 rd → 2 nd)

Study Specification

Input shaft & Output shaft speed sensor

● Type : Hall sensor

● Current consumption : 22mA(MAX)

● sensor body and sensor connector have been unified as one.

Signal Waveform

clip_image005


2010  G 1.6 DOHC  Transmission  Automatic Transaxle  P0722 A/T Output speed Sensor Circuit - Open or Short(GND)


Study Guide and Terminal and Connector Inspection

1.

Study Many malfunctions in the electrical system are caused by poor harness and terminals. Faults Study can also be caused by interference from other electrical systems, and mechanical or chemical damage.

2.

Study Thoroughly check connectors for looseness, poor connection, bending, corrosion, contamination, deterioration, or damage.

3.

Study Has a problem been found?

YES

1)

Repair as necessary and go to "Verification Vehicle Repair" procedure

NO

1)

Go to "Signal Circuit Inspection" procedure

Study Guide and Signal Circuit Inspection

1.

Study Ignition "ON" & Engine "OFF".

2.

Study Disconnect the "OUTPUT SPEED SENSOR" connector

3.

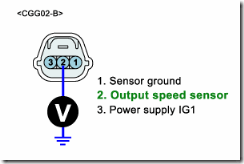
Study Measure voltage between terminal "2" of the OUTPUT SPEED SENSOR harness connector and chassis ground.

A.

Specification : Approx. 5V

clip_image009

4.

Study Is voltage within specifications ?

YES

1)

Study Go to "Power Circuit Inspection" procedure

NO

1)

Study Check for open or short in harness. Repair as necessary and Go to "Verification Vehicle Repair" procedure

2)

Study If signal circuit in harness is OK, Go to "Check PCM/TCM" of the "Component Inspection" procedure.

Study Power Supply Circuit Inspection

1.

Study Ignition "ON" & Engine "OFF".

2.

Study Disconnect the "OUTPUT SPEED SENSOR" connector

3.

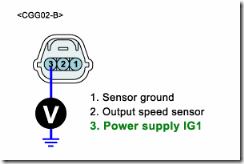
Study Measure voltage between terminal "3" of the OUTPUT SPEED SENSOR harness connector and chassis ground.

A.

Specification : Approx. B+

clip_image010

4.

Study Is voltage within specifications ?

YES

1)

Study Go to "Ground Circuit Inspection" procedure

NO

1)

Study Check for open in harness. Repair as necessary and Go to "Verification Vehicle Repair" procedure

Study Guide and Ground Circuit inspection

1.

Study Ignition "ON" & Engine "OFF".

2.

Study Disconnect the "OUTPUT SPEED SENSOR" connector

3.

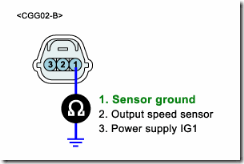
Study Measure resistance between terminal "1" of the OUTPUT SPEED SENSOR harness connector and chassis ground.

A.

Specification : Approx. 0 Ω

clip_image011

4.

Study Is resistance within specifications ?

YES

1)

Study Go to "Component Inspection" procedure

NO

1)

Study Check for open in harness. Repair as necessary and Go to "Verification Vehicle Repair" procedure

2)

Study If ground circuit in harness is OK, Go to "Check PCM/TCM" of the "Component Inspection" procedure

Locations of visitors to this page